
This guide will show you how to install the Projectivy Launcher on Google TV, Android TV, and Fire TV to upgrade your interface.

Projectivy is a custom launcher created by Spocky12 that will change the default user interface on your device to remove ads and much more.
The developer of this launcher frequently updates it with new advancements and improvements. The latest version, V4.71, was released in July 2026 and has tons of added features.
Here are some of the latest enhancements:
- Added ability to tint/colorize wallpapers
- Added ability to tint the wallpaper shadow overlay
- Added ability to use a solid color as wallpaper
- Added ability to request a new wallpaper by long pressing the “play/pause” button on the remote control
- Added ability to extract dynamic color from video wallpapers
- Added preference to define how often the video wallpapers should generate new dynamic colors
- Improved live video stream wallpapers handling (m3u8 files should be playable now)
- Added ability to customize category left/right margins (globally and individually) as well as top margin (individually) (fixes #33)
- Added ability to hide the notification icon (fixes #209)
- Added ability to tint the clock in the statusbar (fixes #115)
- Updated to Material 3 Expressive theming
- Themes : Added ability to import/export themes (=appearance settings, individual stock categories settings, local wallpaper(s)) (premium only)
Most of us know that streaming devices such as the Amazon Firestick and Google TV are riddled with unwanted advertisements and bloatware that fill up the home screen.
Luckily, we can remove all unwanted ads and customize our home screen with a 3rd party launcher and Projectivy is one of the Best Launchers available.
For a more enhanced experience, users can also opt for Projectivy Premium with tons of advanced features. We provide more details on this below.
NOTE: Check out our video guide below that will explain this in more detail and show you the ultimate Firestick Hack.
Projectivy Launcher Special Video Guide
Projectivy allows for more customization options, removes sponsored/suggested content, displays all side-loaded apps, and more.
In the guides below we will show how to install and set up the Projectivy Launcher on a Fire TV Stick 4K Max as well as Android or Google Boxes such as the Onn 4K Pro.
Important Note: To use the Projectivy Launcher correctly, we must install two separate applications. Make sure to follow the guide step by step so you don’t miss anything.
How to Install Projectivy Launcher on Firestick/Fire TV
Below, you will find screenshot guides that will show how to install Projectivy Launcher on the Amazon Firestick and all Fire TV devices running Fire OS 6 or above.
Projectivy is available within the Google Play Store for those with an Android or Google/Android TV.
Step 1: Prepare to Install with Downloader
1. Open the Search bar.

Sick of Slow, Rural Internet?
Whether you live out in the country or take your RV off the grid, Starlink delivers blazing-fast internet to areas that traditional providers ignore.
Check Availability & Pricing
2. Search for Downloader.
Exclusive Surfshark Discount
Warning: Your online activity is currently monitored by your ISP, app/addon/IPTV developers, government agencies, and the websites you visit.
- Become 100% anonymous while streaming and downloading.
- Use on Unlimited Devices & share 1 account with the entire family.
- Save 85% with the 24-Month Plan + Get 3 FREE Months.

3. Choose the Downloader app.

4. Click Download.

5. Wait for the Downloader app to install.

6. You will get a notification when it installs.

7. Launch Settings and turn on Unknown Apps for Downloader.

Step 2: Install Launch on Boot
1. Open Downloader.
Big Tech is Scanning Your Emails
Stop letting free providers read your private messages to build advertising profiles on you. Take back your digital privacy with a secure, ad-free inbox.

2. Click the URL Bar.

3. Type the Downloader Code for TROYPOINT Toolbox: 250931 and click Go.

4. You will see a redirect page.

5. Within the Toolbox, scroll down to find Launch on Boot and click Download.

6. Click Install.

7. After seeing the installation confirmation message, click Done.

8. Choose Delete.

9. Select Delete again.

We will now install Projectivy using the steps below.
Step 3: Install Projectivy Launcher
1. Back in the TROYPOINT Toolbox, find Projectivy Launcher and click Download. You can choose the Stable or Beta version.
Please note that the Beta version will still have various bugs and is only recommended for testing purposes.

2. Click Install.

3. Choose Done.

4. When prompted, click Delete.

5. Select Delete again.

Installation is complete! Now, we can enable the Projectivy Launcher for use.
Step 4: Enable Projectivy within Launch on Boot
1. Return to your Applications on Firestick and open the Launch on Boot app.

2. Scroll through the introduction messages and click Get Started.

3. Click the toggles for Enabled and Launch when device wakes up? Then choose Select App.

4. Choose Projectivy Launcher.

5. Click Test.

6. Scroll through Projectivy introduction messages and click Allow.

7. If prompted, select Allow.

8. As you can see, you must also enable accessibility to use the app.

9. Choose Yes.

10. Click Get Started.

11. You will now see the Projectivy Launcher interface with your installed applications and no ads!
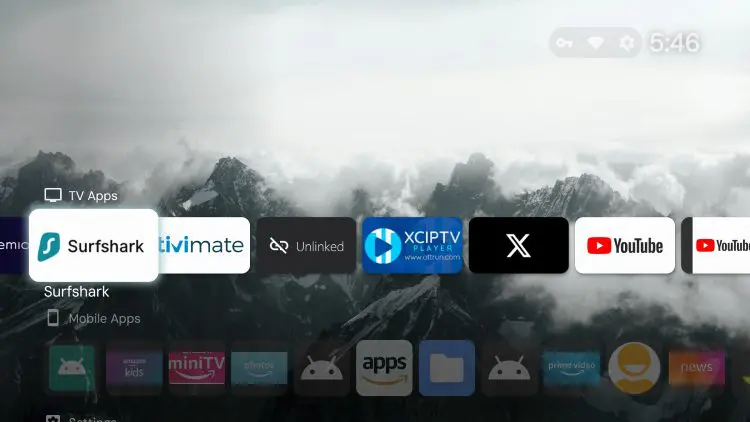
That’s it! You have now activated Projectivy Launcher on your Firestick device.
Projectivy Launcher on Android TV/Google TV
Android TV/Google TV users can also install Projectivy Launcher to eliminate ads that take over these home screens and much more.
This includes tons of Android TV devices such as NVIDIA SHIELD, Google TV Streamer, MECOOL, Onn Google TV Box, and more.
In this guide, we show how to install Projectivy on Chromecast with Google TV via the Downloader App.
You can also find it within the Google Play Store. However, for the latest release, we suggest using the guide below.
NOTE: Before installing Projectivy, you must enable debugging. If you are using an NVIDIA SHIELD, you can find this within Developer Options:

Those using a Google TV device such as Chromecast or onn. can find USB debugging within Developer options as well.

Continue reading to learn How to Install Projectivy Launcher on Android TV:
How to Install Projectivy Launcher on Android TV/Google TV
1. Launch the Downloader App from the home screen of your device.

2. Click the URL bar or Hashtag icon at the top of the screen.

3. Type the Downloader Code for TROYPOINT Toolbox which is 250931 and click the go button.

4. You will then encounter the TROYPOINT Toolbox.

5. Scroll down to find Launcher Manager and click the Download button.

6. Click Install.

7. Choose Done.

8. Click delete to remove the installation file.

9. Select delete again.

10. Back in the TROYPOINT Toolbox, find Projectivy Launcher and click Download. You can choose between the Stable or Beta version.

11. Select Install.

12. Click Done.

13. Click Delete.

14. Choose delete again.

15. Return to the home screen of your device and open Launcher Manager.

16. Select Enable Custom Launcher

17. Enable toggle to Always allow from this computer for USB debugging and click Allow.

18. Click Custom Launcher Options.

19. Choose Projectivy Launcher.

20. Projectivy is now set as the Active launcher.

21. Projectivy will display as the Current Launcher.

22. Click the back button again and scroll through the welcome messages.

23. Click Get Started.

24. You are now met with the Projectivy Launcher home screen.

Custom Launchers including Projectivy has tons of settings and features to customize your home screen.
Removing ads is the best feature this provides as well as options to add Display Profiles, rearrange apps, and much more.
We suggest testing all options within Projectivy to make the most of this launcher on your preferred media device.
Projectivy Premium
Projectivy Premium is the paid upgrade for Projectivy Launcher that unlocks deeper customization, automation, and UI control beyond the already-powerful free version.
While the base launcher already replaces the stock Android TV home screen, Premium is aimed at users who want a fully dialed-in, personalized interface with advanced features.
It is currently available for a one-time fee of $7.49 and can be purchased within the App Settings.

Premium Features
Advanced Customization
- Custom wallpapers per category/row
- More control over layout spacing, scaling, and UI elements
- Hide or tweak nearly every on-screen component
- Fine-tune card styles, transparency, and backgrounds
Channel & Row Control
- Create and fully customize home screen rows (channels)
- Reorder, rename, and design rows however you want
- Display apps, content, or shortcuts exactly how you prefer
Automation & Behavior
- Set default startup apps or screens
- Auto-launch specific apps on boot
- Customize navigation behavior (button actions, focus behavior)
App & Shortcut Management
- Create custom shortcuts and deep links
- Group apps however you want (not limited to stock categories)
- Better control over hidden/system apps
Backup & Restore
- Save your full launcher setup
- Restore layouts across devices or after resets
- Great for power users managing multiple devices
UI Enhancements
- Improved focus animations and transitions
- Cleaner navigation experience
- More polished “premium” feel overall
Description & Details
The best way to find all available features is by navigating and testing the application to see the full functionality it provides.
There are tons of great assets you will find that make it one of the best launchers available today.
With the latest upgrade comes some new improvements that are welcome changes among Projectivy users.
This includes the ability to Install 3rd party apps directly from the home screen of your device.

You can do so with a Custom URL (like you would with Downloader) or via Aptoide TV etc.

If you see the Accessibility message at the bottom, make sure to click Enable.

You can also adjust Categories to your preference by adding/removing/replacing different options.

If you love Projectivy, you can opt for the Premium version which offers advanced features not supported by the free platform.

Projectivy Icon Pack
A fabulous feature that is available to Premium users of Projectivy is the ability to integrate the “Icon Pack” that is only compatible with this launcher.
This Premium feature provides a replacement icon set that gives your apps a more consistent, clean, and polished look.

Projectivy Launcher lets you customize your home screen heavily—but without a unified icon pack, your layout can still look sloppy.
The icon pack fixes that by:
- Converting icons into a uniform shape/style
- Improving resolution and consistency
- Making your home screen look more like a curated UI
How to Install Projectivy Icon Pack
1. Open the TROYPOINT Toolbox and scroll down to find Projectivy Icon Pack. Click Download.

2. Select Install.

3. Choose Done.

4. Delete the installation file.

5. Open Projectivy Launcher.

6. Click Settings.

7. Choose Projectivy Settings.

8. Click Appearance.

9. Choose Cards.

10. Select Icon Pack.

11. Choose Projectivy Icon Pack.

Enjoy!
Final Thoughts from Troy
Using a custom launcher such as Projectivy is one of the best ways to eliminate ads and clean up the interface on your favorite device.
If you are not a fan of the default Fire TV interface, try installing this launcher on your Firestick/Fire TV/Android/Google box today!
Special thanks to spocky12, the developer of the Projectivy Launcher.
This page includes affiliate links where TROYPOINT may receive a commission at no extra cost to you. Many times, visitors will receive a discount due to the special arrangements made for our fans. Learn more on my Affiliate Disclaimer page.


